开篇警示!
- 一定要一步一步解决
- 安装Ubuntu需要的环境可为Ubuntu16.04与Ubuntu18.04(此环境检验可用,其他未知),推荐Ubuntu18.04
- 要保证磁盘空间足够大或是后续磁盘空间可扩容,因为配置完成后,20G的磁盘只会剩余1.3G左右的可用空间,后续编译运行直接挂
- 本文教程配置如下:
| 项目 | 内容 |
|---|---|
| 环境 | VMWare16虚拟环境 |
| 系统 | Ubuntu18.04 |
| ROS版本 | ros-melodic |
| 控制 | PX4 |
| 仿真平台 | Gazebo |
一、安装依赖
- 使用apt安装安装Python2、pip、Python3、pip3
sudo apt update

# 安装Python2.7
sudo apt install python
sudo apt install python-pip

#Ubuntu18.04默认安装Python3.6.9,如果没有则下载
sudo apt install python3.6
sudo apt install python3-pip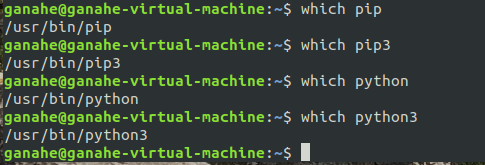
- 其他依赖安装
sudo apt install -y ninja-build exiftool python-argparse python-empy python-toml python-numpy python-yaml python-dev python-pip ninja-build protobuf-compiler libeigen3-dev genromfs xmlstarlet libgstreamer1.0-dev libgstreamer-plugins-base1.0-dev

pip2 install pandas jinja2 pyserial cerberus pyulog numpy toml pyquaternion

pip3 install packaging numpy empy toml pyyaml jinja2- 有时候apt报错,提示“有几个软件包无法下载,要不运行 apt-get update 或者加上 --fix-missing 的选项再试试?”,这时按照提示的要求进行操作即可。
(扩展)如果出现如下报错情况,可先更新 setuptools 和 pip,否则跳过
Collecting pandas
  Using cached https://files.pythonhosted.org/packages/64/f1/8fdbd74edfc31625d597717be8c155c6226fc72a7c954c52583ab81a8614/pandas-1.1.2.tar.gz
    Complete output from command python setup.py egg_info:
    Traceback (most recent call last):
      File "<string>", line 1, in <module>
      File "/tmp/pip-build-qtvsjq8t/pandas/setup.py", line 349
        f"{extension}-source file '{sourcefile}' not found.\n"
                                                             ^
    SyntaxError: invalid syntax

    ----------------------------------------
Command "python setup.py egg_info" failed with error code 1 in /tmp/pip-build-qtvsjq8t/pandas/
执行:
pip install --upgrade setuptools
#若未报错不需要输入这两行命令
python -m pip install --upgrade pip
• 特别提醒,在整个环境配置中,不要轻易使用 apt-get autoremove,详见
慎用apt-get autoremove
• 特别提醒,PX4和ROS不能使用Anaconda,如果之前已经安装,在.bashrc里一定要把相关代码注释掉
二、ROS安装
安装步骤ROS官网,需注意:
-
Ubuntu 16.04对应Kinetic,18.04对应Melodic,XTDrone平台目前支持这两个发行版,本教程以Ubuntu18.04为基准,对应Melodic。
-
如果您的网络环境不佳,Setup your sources.list 时中可选择中科大镜像或清华镜像。
下面开始安装ROS-Melodic教程(也可自行查看官网教程):
配置国内镜像源(Ubuntu的Desktop版本可用设置选项配置 或 命名行配置):
手动配置:在软件列表中找到 software & updates,点击后Download from选择other更改:
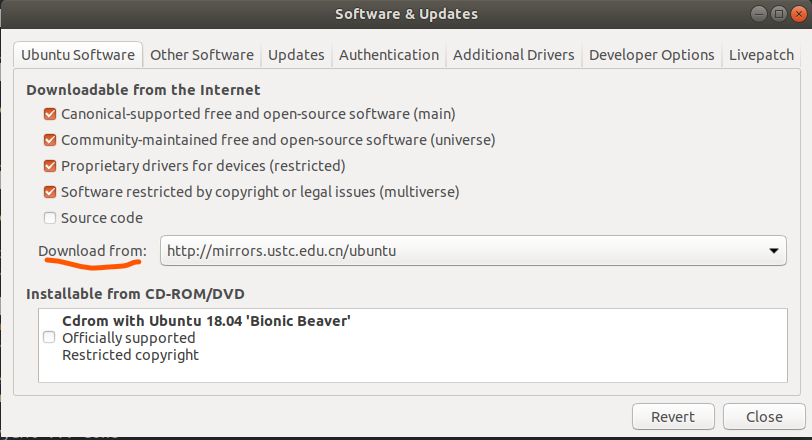
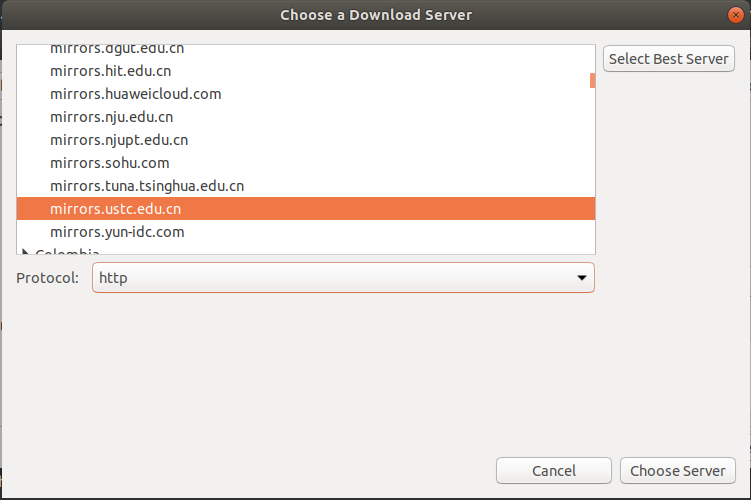
建议自己点击Select Best Server自行定位到最佳下载速度的源,我定位到的是China下的清华源:
保存退出。
执行:sudo apt update,此步骤实际上可不用,在配置后关闭时,系统已经更新了,但为了避免个别朋友没有注意关闭保存,可以执行一次确保更新。
安装ROS
- 配置ROS软件源以接受来自package.ros.org的软件包:
sudo sh -c 'echo "deb http://packages.ros.org/ros/ubuntu $(lsb_release -sc) main" > /etc/apt/sources.list.d/ros-latest.list'- 配置密钥
sudo apt-key adv --keyserver 'hkp://keyserver.ubuntu.com:80' --recv-key C1CF6E31E6BADE8868B172B4F42ED6FBAB17C654执行结果如下即可:
sudo apt-key adv --keyserver 'hkp://keyserver.ubuntu.com:80' --recv-key C1CF6E31E6BADE8868B172B4F42ED6FBAB17C654
Executing: /tmp/apt-key-gpghome.0oSwXKzemT/gpg.1.sh --keyserver hkp://keyserver.ubuntu.com:80 --recv-key C1CF6E31E6BADE8868B172B4F42ED6FBAB17C654
gpg: key F42ED6FBAB17C654: public key "Open Robotics <info@osrfoundation.org>" imported
gpg: Total number processed: 1
gpg:               imported: 1
- 再次更新系统软件源
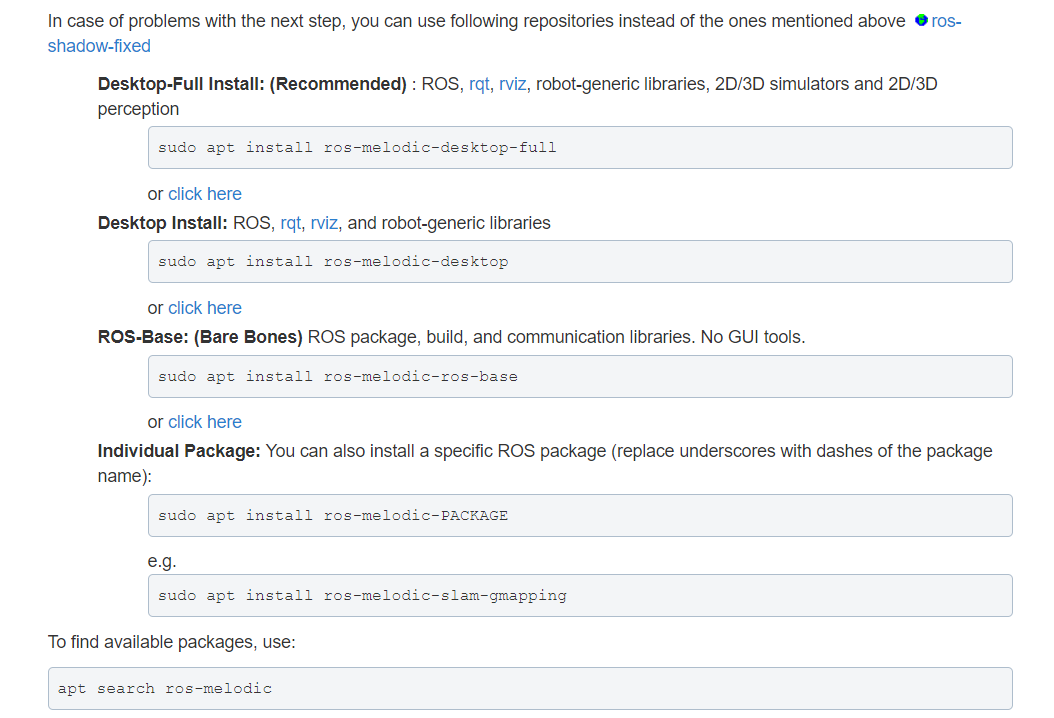
sudo apt update- Desktop版本桌面安装:ROS、rqt、rviz和机器人通用库
sudo apt install ros-melodic-desktop
可以选择安装Melodic不同的版本,不同版本之间,包含的软件包不同,其他版本官方的指令如下,可自行选择:
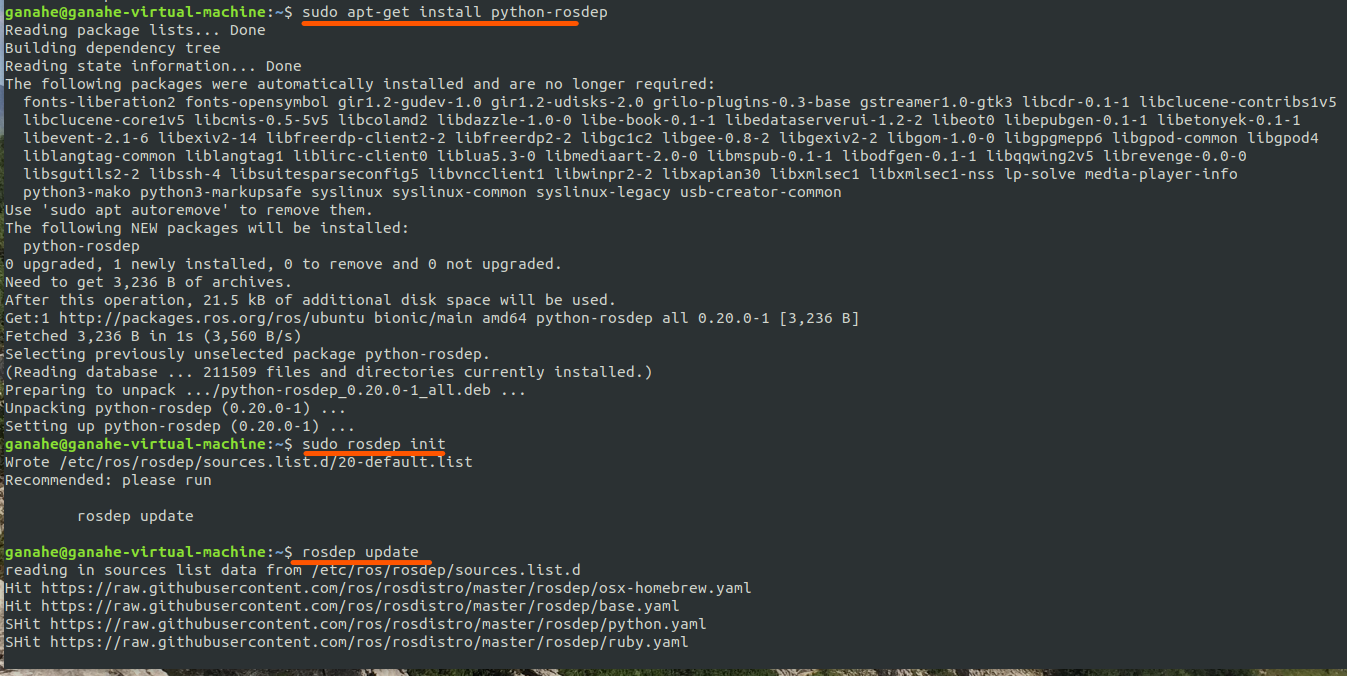
- 初始化rosdep(问题常出)
sudo rosdep init

sudo rosdep fix-permissions

rosdep update
5.1 如报错找不到 rosdep 命令:
ganahe@ganahe-virtual-machine:~$ sudo rosdep init
sudo: rosdep: command not found
则执行如下命令再继续上面的操作:
sudo apt-get install python-rosdep5.2 如报错网络连接失败,是网络问题导致,而不是软件源的问题,解决办法:
#备份hosts文件,以防瞎改
sudo cp /etc/hosts /etc/hosts_backup
#打开hosts文件
sudo gedit /etc/hosts
#在文件末尾添加
151.101.84.133  raw.githubusercontent.com
保存后退出再执行以上操作。
处理完成后,出现如下则正常:
- 配置用户环境
echo "source /opt/ros/melodic/setup.bash" >> ~/.bashrc
source ~/.bashrc
这两条指令相当于Windows系统中设置环境变量path,实现在terminal中执行ROS系统指令,这里强调是系统指令,而不是自己创建的包或者节点,后者是需要使能相应的工作空间,具体可以参考:ROS工作空间。
查看环境变量是否设置正确,命令如下:
env | grep ROS- 构建包的依赖关系
到目前为止,已经安装了运行核心ROS软件包所需的软件。 为了创建和管理自己的ROS工作区,有各种工具和要求分别分发。 例如,rosinstall是一个常用的命令行工具,使您可以通过一个命令轻松下载ROS软件包的许多源代码树。
要安装此工具和其他依赖项以构建ROS软件包,请运行:
sudo apt install python-rosdep python-rosinstall python-rosinstall-generator python-wstool build-essential- 验证安装
执行rosversion -d出现:
ganahe@ganahe-virtual-machine:~$ rosversion -d
melodic
安装完成后,启动roscore:
roscore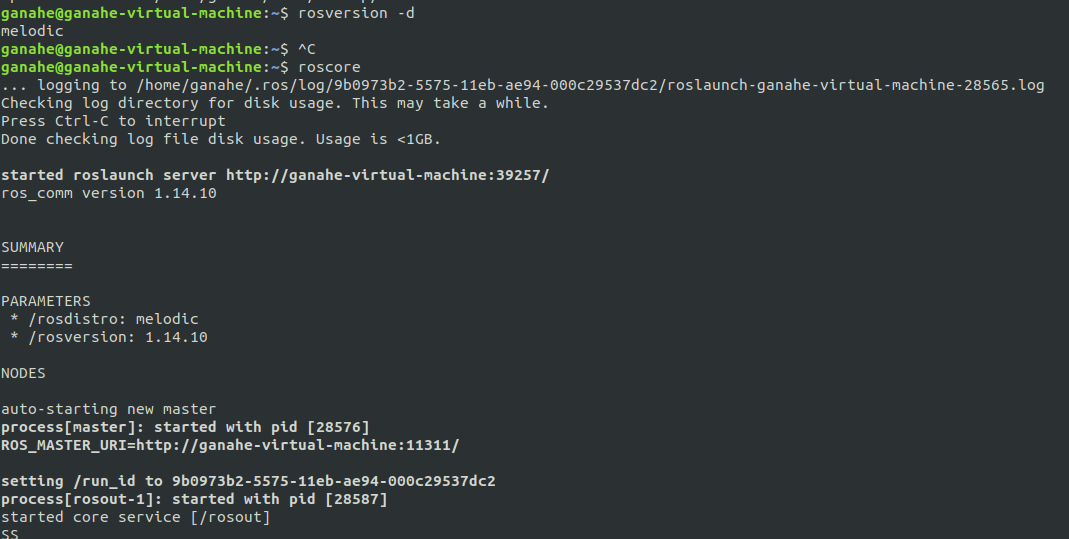
成功安装ROS melodic。
- 工作空间管理
如果之前没有catkin_ws,则需要新建工作空间,之后除去PX4仿真环境启动外,其余ROS相关工程在此工作空间下管理。
mkdir -p ~/catkin_ws/src
mkdir -p ~/catkin_ws/scripts

# 移动到工作空间,如果使用catkin-tools话,则为cd catkin_ws && catkin init
cd catkin_ws/src && catkin_init_workspace

cd .. && catkin_make # 使用catkin-tools话,则为catkin build catkin-tools与catkin_make的区别参见Migrating from catkin_make,自行选择合适的管理工具。
执行效果如下:
ganahe@ganahe-virtual-machine:~mkdir -p ~/catkin_ws/src
ganahe@ganahe-virtual-machine:~ mkdir -p ~/catkin_ws/scripts
ganahe@ganahe-virtual-machine:~cd catkin_ws/src && catkin_init_workspace
Creating symlink "/home/ganahe/catkin_ws/src/CMakeLists.txt" pointing to "/opt/ros/melodic/share/catkin/cmake/toplevel.cmake"
ganahe@ganahe-virtual-machine:~/catkin_ws/src ls
CMakeLists.txt
ganahe@ganahe-virtual-machine:~/catkin_ws/srccd .. && catkin_make
Base path: /home/ganahe/catkin_ws
Source space: /home/ganahe/catkin_ws/src
Build space: /home/ganahe/catkin_ws/build
Devel space: /home/ganahe/catkin_ws/devel
Install space: /home/ganahe/catkin_ws/install
####
#### Running command: "cmake /home/ganahe/catkin_ws/src -DCATKIN_DEVEL_PREFIX=/home/ganahe/catkin_ws/devel -DCMAKE_INSTALL_PREFIX=/home/ganahe/catkin_ws/install -G Unix Makefiles" in "/home/ganahe/catkin_ws/build"
####
l
-- The C compiler identification is GNU 7.5.0
-- The CXX compiler identification is GNU 7.5.0
-- Check for working C compiler: /usr/bin/cc
-- Check for working C compiler: /usr/bin/cc -- works
-- Detecting C compiler ABI info
-- Detecting C compiler ABI info - done
-- Detecting C compile features
-- Detecting C compile features - done
-- Check for working CXX compiler: /usr/bin/c++
-- Check for working CXX compiler: /usr/bin/c++ -- works
-- Detecting CXX compiler ABI info
-- Detecting CXX compiler ABI info - done
-- Detecting CXX compile features
-- Detecting CXX compile features - done
-- Using CATKIN_DEVEL_PREFIX: /home/ganahe/catkin_ws/devel
-- Using CMAKE_PREFIX_PATH: /opt/ros/melodic
-- This workspace overlays: /opt/ros/melodic
-- Found PythonInterp: /usr/bin/python2 (found suitable version "2.7.17", minimum required is "2")
-- Using PYTHON_EXECUTABLE: /usr/bin/python2
-- Using Debian Python package layout
-- Using empy: /usr/bin/empy
-- Using CATKIN_ENABLE_TESTING: ON
-- Call enable_testing()
-- Using CATKIN_TEST_RESULTS_DIR: /home/ganahe/catkin_ws/build/test_results
-- Found gtest sources under '/usr/src/googletest': gtests will be built
-- Found gmock sources under '/usr/src/googletest': gmock will be built
-- Found PythonInterp: /usr/bin/python2 (found version "2.7.17")
-- Looking for pthread.h
-- Looking for pthread.h - found
-- Looking for pthread_create
-- Looking for pthread_create - not found
-- Looking for pthread_create in pthreads
-- Looking for pthread_create in pthreads - not found
-- Looking for pthread_create in pthread
-- Looking for pthread_create in pthread - found
-- Found Threads: TRUE
-- Using Python nosetests: /usr/bin/nosetests-2.7
-- catkin 0.7.29
-- BUILD_SHARED_LIBS is on
-- BUILD_SHARED_LIBS is on
-- Configuring done
-- Generating done
-- Build files have been written to: /home/ganahe/catkin_ws/build
####
#### Running command: "make -j4 -l4" in "/home/ganahe/catkin_ws/build"
####
ganahe@ganahe-virtual-machine:~/catkin_ws l
build/  devel/  scripts/  src/
三、安装Gazebo
(一)注意事项
• 注意:Melodic自带的gazebo9版本过低,建议升级
-
选用
Alternative installation: step-by-step的安装方式,安装最新的gazebo9,不要安装gazebo11 -
如果安装有依赖问题,可以使用
sudo aptitude install gazebo9,选择合理的依赖解决办法(别把ROS删了)
(二)开始安装
有两种安装方式,一种从官方获取脚本一行代码实现安装,但是此方式虽然简单,但安装时缺斤少两,不好处理;
选择”循序渐进“方式:
- 配置源以接受来自packes.osrfoundation.org的软件
sudo sh -c 'echo "deb http://packages.osrfoundation.org/gazebo/ubuntu-stable `lsb_release -cs` main" > /etc/apt/sources.list.d/gazebo-stable.list'检查是否配置成功cat /etc/apt/sources.list.d/gazebo-stable.list:
ganahe@ganahe-virtual-machine:~/catkin_ws$ cat /etc/apt/sources.list.d/gazebo-stable.list
deb http://packages.osrfoundation.org/gazebo/ubuntu-stable bionic main- 配置密钥
wget https://packages.osrfoundation.org/gazebo.key -O - | sudo apt-key add --
安装Gazebo9
首先更新debian数据库:
sudo apt-get update下载版本9:
sudo apt-get install gazebo9
安装完成后执行gazebo运行如下:

如果报错:
ganahe@ganahe-virtual-machine:~$ gazebo
VMware: vmw_ioctl_command error Invalid argument.
执行export SVGA_VGPU10=0再运行。
- 安装ROS的Gazebo插件
Gazebo本身是独立于ROS的,因此还需要安装ROS的Gazebo插件:
sudo apt install ros-melodic-gazebo-*如果是kinetic版本,执行sudo apt install ros-kinetic-gazebo9-* 。
- 获取gazebo模型
Gazebo有很多开源的模型文件,整个模型文件大致有1G,官方下载的速度极慢,可从合作平台微信公众号:星辰换日,获取下载提取码:
链接:https://pan.baidu.com/s/16LWBEBkxDLjRdgKfDm-mXA
回复Gazebo仿真模型即可。
将该压缩包解压缩后放在~/.gazebo中(一般在home目录),此时在~/.gazebo/models/路径下可以看到很多模型。如果不做这一步,之后运行Gazebo仿真,可能会缺模型,这时会自动下载,国内的网比较慢,自动下载会下载比较久。
四、MAVROS安装
注意,mavros-extras一定别忘记装,否则视觉定位将无法完成
   # ros-melodic版本,ros-kinetic的需要看后面标注。
sudo apt install ros-melodic-mavros ros-melodic-mavros-extras
wget https://raw.githubusercontent.com/mavlink/mavros/master/mavros/scripts/install_geographiclib_datasets.sh
sudo chmod a+x ./install_geographiclib_datasets.sh
sudo ./install_geographiclib_datasets.sh #这步需要装一段时间,请耐心等待PX4配置ros-kinetic第一句执行版本:sudo apt install ros-kinetic-mavros ros-kinetic-mavros-extras
五、PX4配置
以下给出推荐配置,更多PX4仿真配置,见PX4仿真文档 。
由于国内的github下载速度较慢,XTDrone开发团队把固件和submodule同步到了gitee,如果嫌github慢,可以从gitee下载。
github(不推荐)
git clone https://github.com/PX4/PX4-Autopilot.git
mv PX4-Autopilot PX4_Firmware
cd PX4_Firmware
git checkout -b xtdrone/dev v1.11.0-beta1
git submodule update --init --recursive
make px4_sitl_default gazebo
gitee(推荐)
git clone https://gitee.com/robin_shaun/PX4_Firmware
cd PX4_Firmware
git checkout -b xtdrone/dev v1.11.0-beta1
如果是从gitee下载,则更新submodule前,需要修改替换 .gitmodules的内容为如下:
[submodule "mavlink/include/mavlink/v2.0"]
    path = mavlink/include/mavlink/v2.0
    url = https://gitee.com/robin_shaun/c_library_v2.git
    branch = master
[submodule "src/drivers/uavcan/libuavcan"]
    path = src/drivers/uavcan/libuavcan
    url = https://gitee.com/robin_shaun/uavcan.git
    branch = px4
[submodule "Tools/jMAVSim"]
    path = Tools/jMAVSim
    url = https://gitee.com/robin_shaun/jMAVSim.git
    branch = master
[submodule "Tools/sitl_gazebo"]
    path = Tools/sitl_gazebo
    url = https://gitee.com/robin_shaun/sitl_gazebo.git
    branch = master
[submodule "src/lib/matrix"]
    path = src/lib/matrix
    url = https://gitee.com/robin_shaun/Matrix.git
    branch = master
[submodule "src/lib/ecl"]
    path = src/lib/ecl
    url = https://gitee.com/robin_shaun/ecl.git
    branch = master
[submodule "boards/atlflight/cmake_hexagon"]
    path = boards/atlflight/cmake_hexagon
    url = https://gitee.com/robin_shaun/cmake_hexagon.git
    branch = px4
[submodule "src/drivers/gps/devices"]
    path = src/drivers/gps/devices
    url = https://gitee.com/robin_shaun/GpsDrivers.git
    branch = master
[submodule "src/modules/micrortps_bridge/micro-CDR"]
    path = src/modules/micrortps_bridge/micro-CDR
    url = https://gitee.com/robin_shaun/micro-CDR.git
    branch = px4
[submodule "platforms/nuttx/NuttX/nuttx"]
    path = platforms/nuttx/NuttX/nuttx
    url = https://gitee.com/robin_shaun/NuttX.git
    branch = px4_firmware_nuttx-9.1.0+
[submodule "platforms/nuttx/NuttX/apps"]
    path = platforms/nuttx/NuttX/apps
    url = https://gitee.com/robin_shaun/NuttX-apps.git
    branch = px4_firmware_nuttx-9.1.0+
[submodule "platforms/qurt/dspal"]
    path = platforms/qurt/dspal
    url = https://gitee.com/robin_shaun/dspal.git
[submodule "Tools/flightgear_bridge"]
    path = Tools/flightgear_bridge
    url = https://gitee.com/robin_shaun/PX4-FlightGear-Bridge.git
    branch = master
[submodule "Tools/jsbsim_bridge"]
    path = Tools/jsbsim_bridge
    url = https://gitee.com/robin_shaun/px4-jsbsim-bridge.git
[submodule "src/examples/gyro_fft/CMSIS_5"]
    path = src/examples/gyro_fft/CMSIS_5
    url = https://gitee.com/mirrors/CMSIS_5
先执行:
#切换到PX4代码目录
cd PX4_Firmware
#备份
sudo cp .gitmodules .gitmodules_backup
# 打开文件替换内容
sudo gedit .gitmodules
随后执行:
git submodule update --init --recursive
make px4_sitl_default gazebo
如果编译报错提示PX4_Firmware/Tools/sitl_gazebo/src/gazebo_usv_dynamics_plugin.cpp中的ignition::math::Matrix4 xformV(vq);语句中,xformV之前没有定义类型
将其修改为ignition::math::Matrix4<double> xformV(vq);保存之后重新编译。
注意:如果编译没有因为代码原因报错,而是c++: internal compiler error: killed (program cc1plus)
参见解决办法:传送
注意二!XTDone平台更新了子模块,推荐采用XTDrone方式更新子模块后重新编译 于 2021-04-13
其他错误可自行根据提示修正或搜寻解决办法。
如未报错,但是卡顿是正常现象,耐心等待编译。
虚拟机下,编译了无尽岁月......三小时,完成:
编译完成后,会弹出Gazebo界面,将其关闭即可。
配置用户环境
执行sudo gedit ~/.bashrc修改 ~/.bashrc,在最末尾加入以下代码,注意路径匹配,前两个source顺序不能颠倒。
source ~/catkin_ws/devel/setup.bash
source ~/PX4_Firmware/Tools/setup_gazebo.bash ~/PX4_Firmware/ ~/PX4_Firmware/build/px4_sitl_default
export ROS_PACKAGE_PATH=ROS_PACKAGE_PATH:~/PX4_Firmware
export ROS_PACKAGE_PATH=ROS_PACKAGE_PATH:~/PX4_Firmware/Tools/sitl_gazebo
再运行:
source ~/.bashrc
然后运行如下命令:
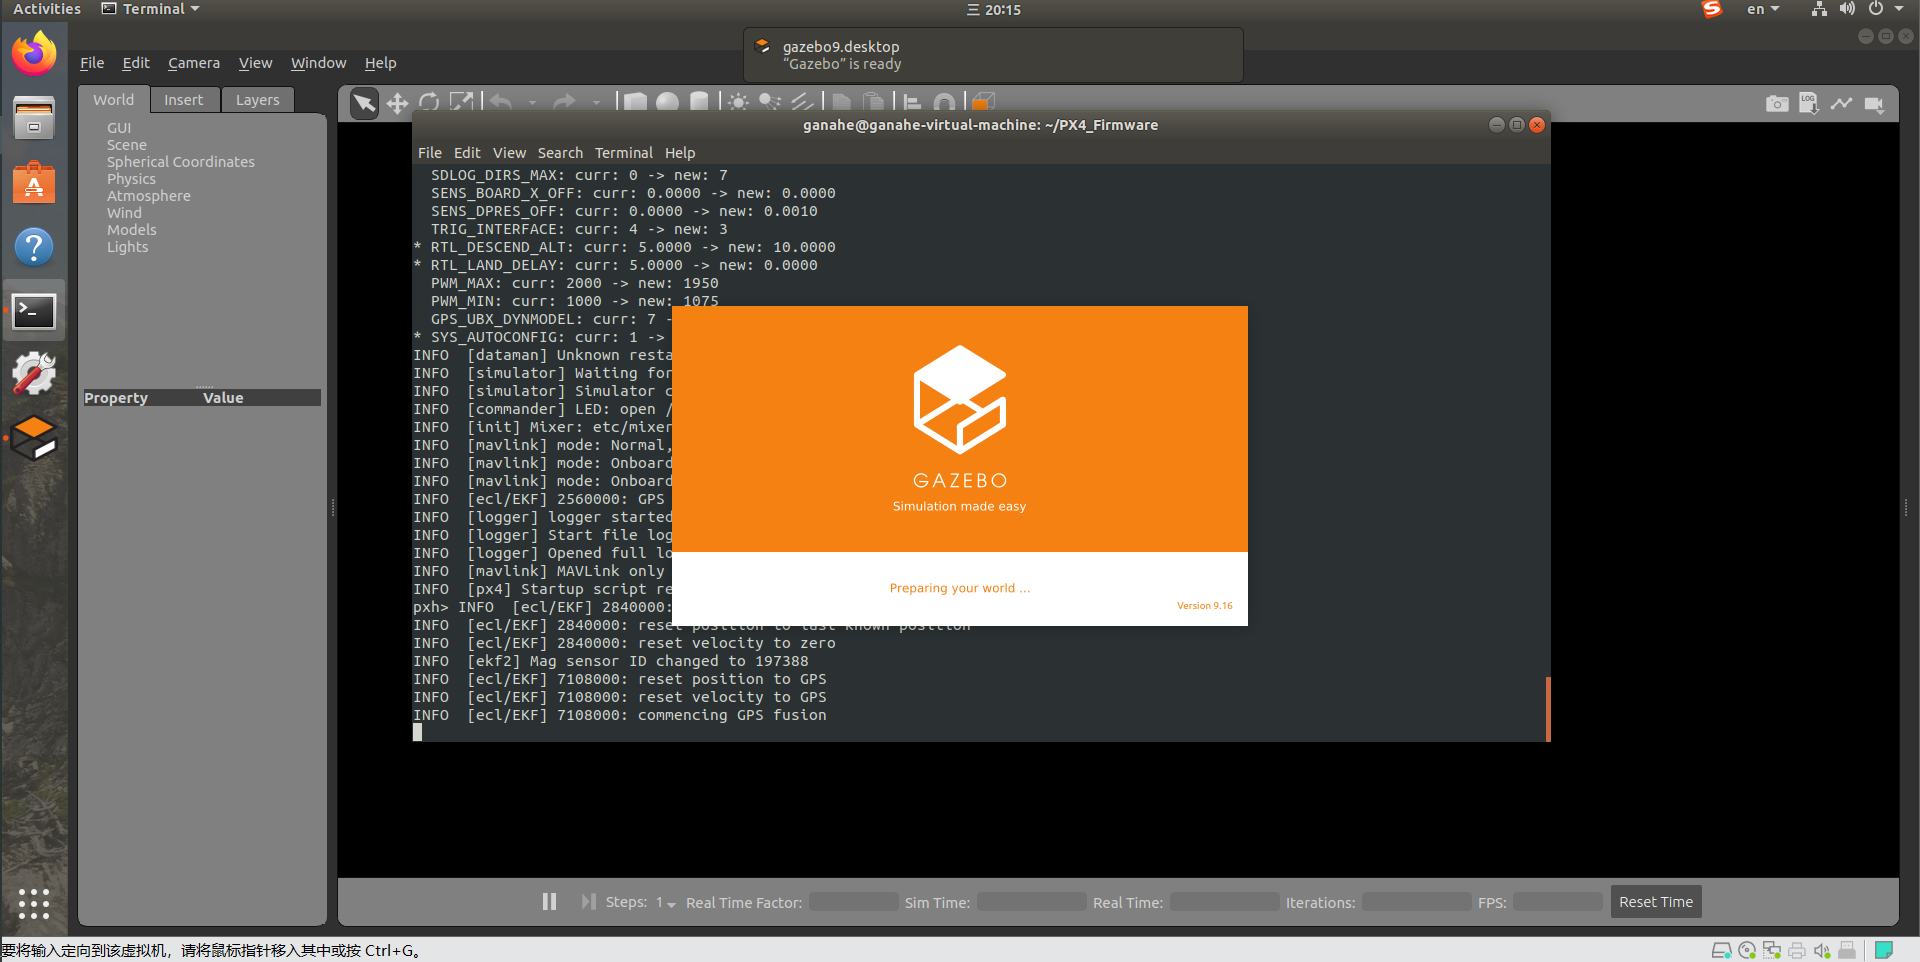
cd ~/PX4_Firmware
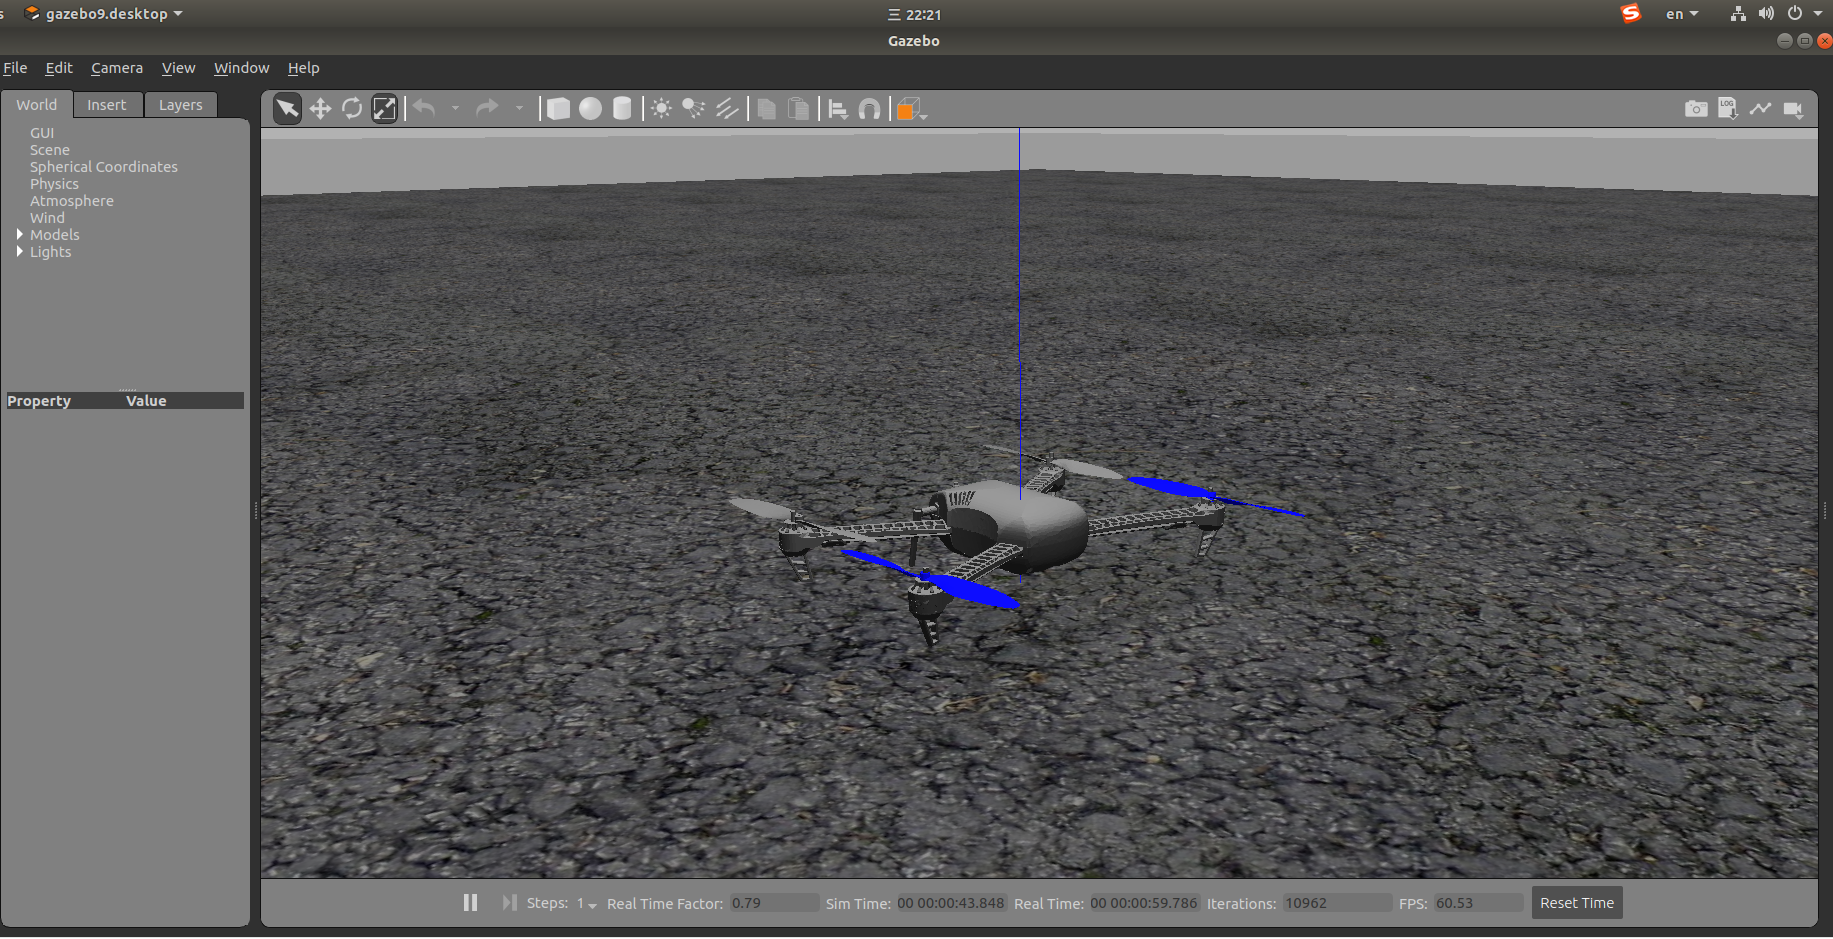
roslaunch px4 mavros_posix_sitl.launch此时会启动Gazebo,如下图所示。

另开终端,运行:
rostopic echo /mavros/state若connected: True,则说明MAVROS与SITL通信成功。
---
header:
seq: 11
stamp:
secs: 1827
nsecs: 173000000
frame_id: ''
connected: True
armed: False
guided: False
manual_input: True
mode: "MANUAL"
system_status: 3

---- 特别注意:如若出现如下等类似字样,需要更新gazebo即可:
process[gazebo-2]: started with pid [5115]
process[gazebo_gui-3]: started with pid [5120]
process[vehicle_spawn_ganahe_virtual_machine_5092_5457550620360429646-4]: started with pid [5125]
] has died!
process has died [pid 5114, exit code 255, cmd /home/ganahe/PX4_Firmware/build/px4_sitl_default/bin/px4 /home/ganahe/PX4_Firmware/ROMFS/px4fmu_common -s etc/init.d-posix/rcS name:=sitl log:=/home/ganahe/.ros/log/56afecbe-55a2-11eb-8e61-000c29537dc2/sitl-1.log].
log file: /home/ganahe/.ros/log/56afecbe-55a2-11eb-8e61-000c29537dc2/sitl-1*.log
Initiating shutdown!
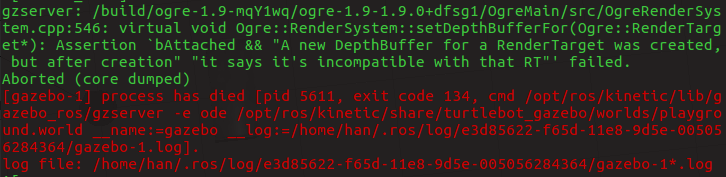
更新gazebo:
```bash
sudo sh -c 'echo "deb http://packages.osrfoundation.org/gazebo/ubuntu-stable `lsb_release -cs` main" > /etc/apt/sources.list.d/gazebo-stable.list'
wget http://packages.osrfoundation.org/gazebo.key -O - | sudo apt-key add -
sudo apt-get update
sudo apt-get install gazebo9 gazebo9-common
#关闭硬件加速
echo " export SVGA_VGPU10=0" >> ~/.bashrc
source ~/.bashrc六、安装地面控制站QGroundControl
然后需要安装地面站QGroundControl,点此安装链接。
QGroundControl可以安装/运行在Ubuntu LTS 18.04(及更高版本)上。
Ubuntu附带了一个串口调制解调器管理器,它会干扰任何与机器人相关的串口(或USB串口)的使用。在安装QGroundControl之前,应该删除调制解调器管理器,并授予自己访问串口的权限。为了支持视频流,还需要安装GStreamer。
首次安装QGroundControl前:
1.在命令提示符上输入:
sudo usermod -a -G dialout $USER
sudo apt-get remove modemmanager -y
sudo apt install gstreamer1.0-plugins-bad gstreamer1.0-libav gstreamer1.0-gl -y
2.重启:注销并再次登录以启用对用户权限的更改。
3.下载 QGroundControl.AppImage(点击画线部分即可下载)。
4.运行:
# 先加权限
chmod +x ./QGroundControl.AppImage

# 终端运行
./QGroundControl.AppImage

#或是手动双击,点个赞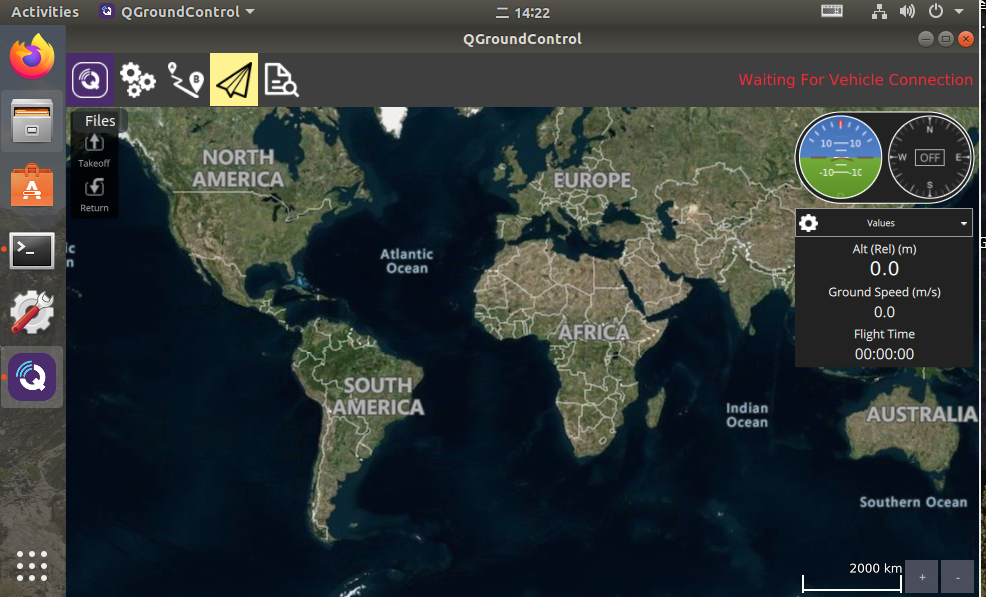
注意Ubuntu16.04没法直接使用QGroundcontrol 版本4系列(可以使用版本3系列),Ubuntu16.04需要源码编译版本4系列,请仔细查看安装链接。
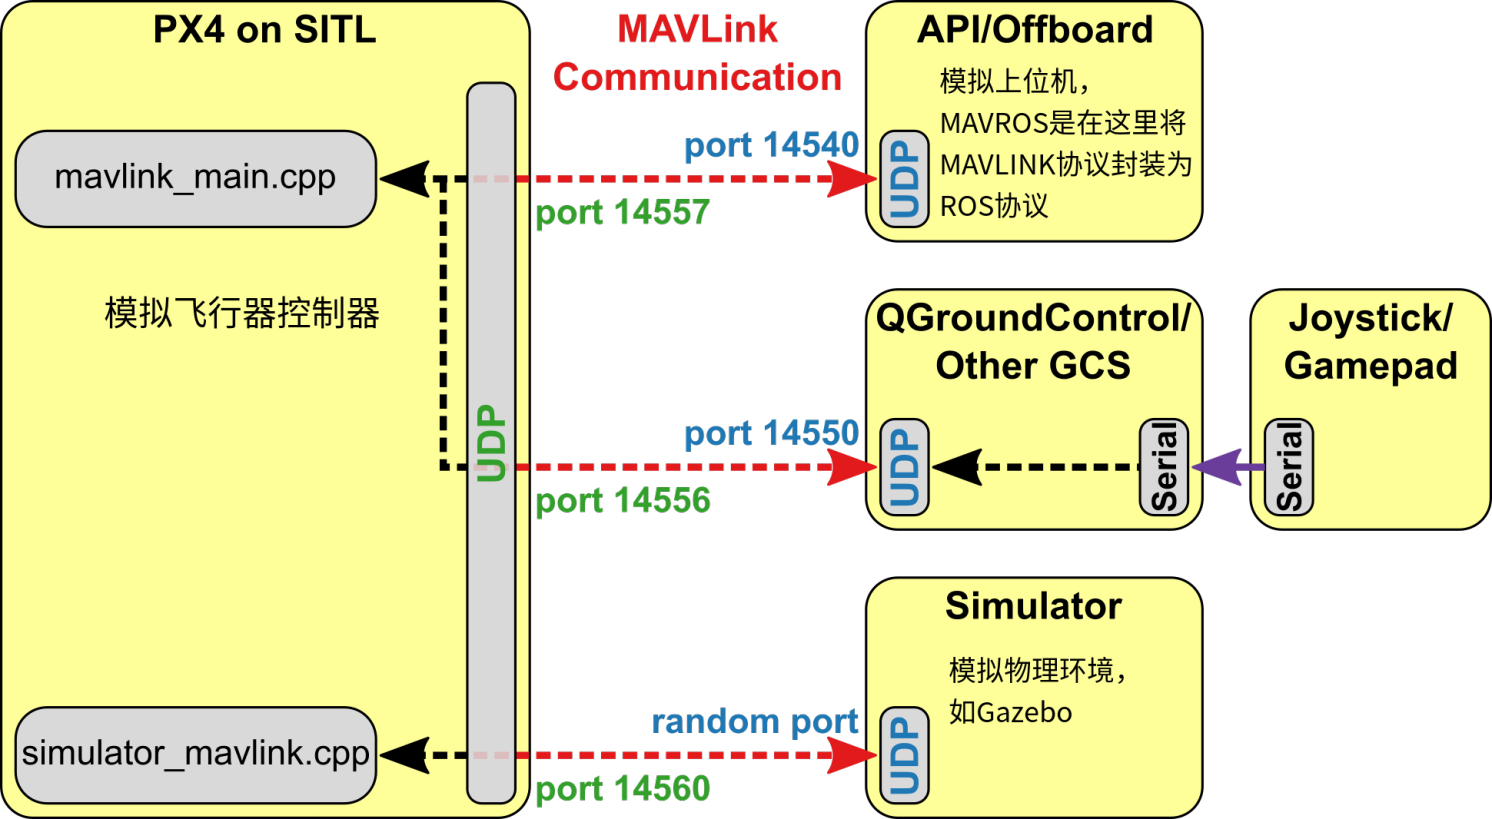
至此,PX4与ROS基础配置完成,各部分间的关系如下图所示,详见PX4仿真文档
七、附加项:配置编译XTDrone
XTDrone源码下载
git clone https://gitee.com/robin_shaun/XTDrone.git
cd XTDrone
git submodule update --init --recursive
cp sensing/gimbal/gazebo_gimbal_controller_plugin.cpp ~/PX4_Firmware/Tools/sitl_gazebo/src/
cp sitl_config/init.d-posix/rcS ~/PX4_Firmware/ROMFS/px4fmu_common/init.d-posix/
cp sitl_config/worlds/* ~/PX4_Firmware/Tools/sitl_gazebo/worlds/
cp -r sitl_config/models/* ~/PX4_Firmware/Tools/sitl_gazebo/models/
cp -r sitl_config/models/{3d_gpu_lidar,3d_lidar,hokuyo_lidar,kinect,stereo_camera} ~/.gazebo/models/
cp sitl_config/launch/* ~/PX4_Firmware/launch/注意由于修改了PX4 sitl_gazebo中的gazebo_gimbal_controller_plugin.cpp(源代码不能控制多无人机的云台),要再编译一次。
cd ~/PX4_Firmware
make px4_sitl_default gazebo
八、检验:用键盘控制无人机
在一个终端运行:
cd ~/PX4_Firmware
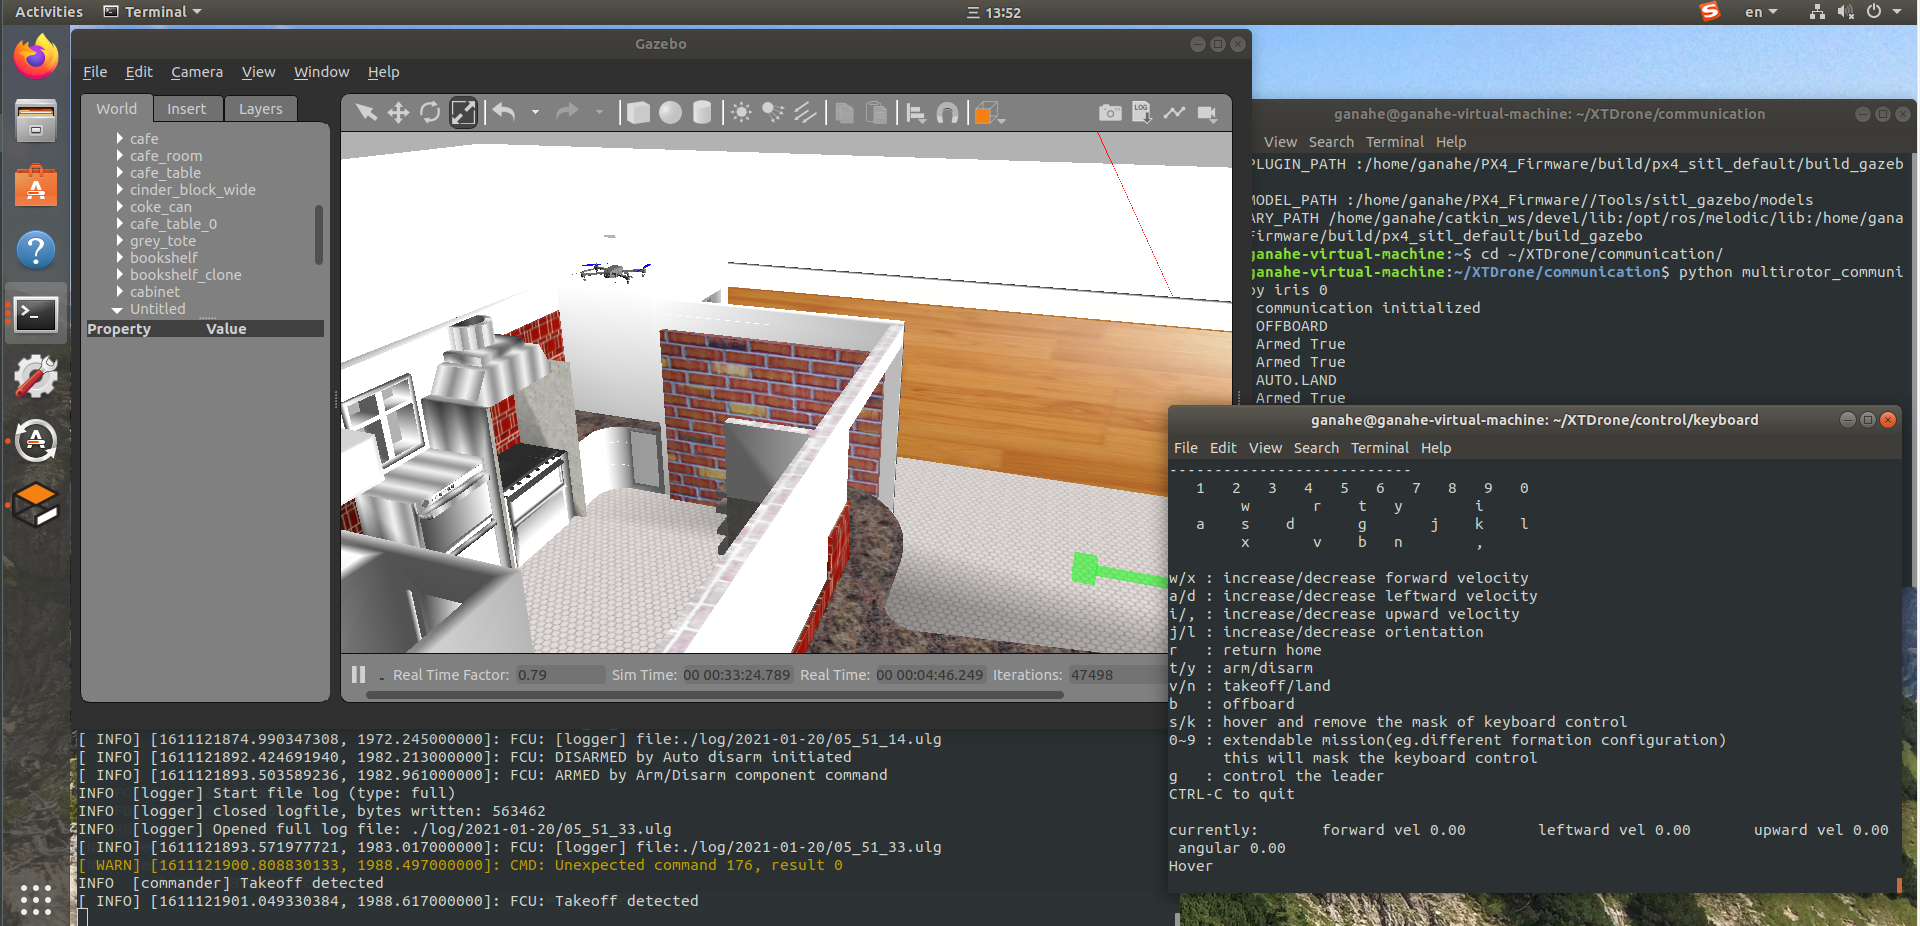
roslaunch px4 indoor1.launch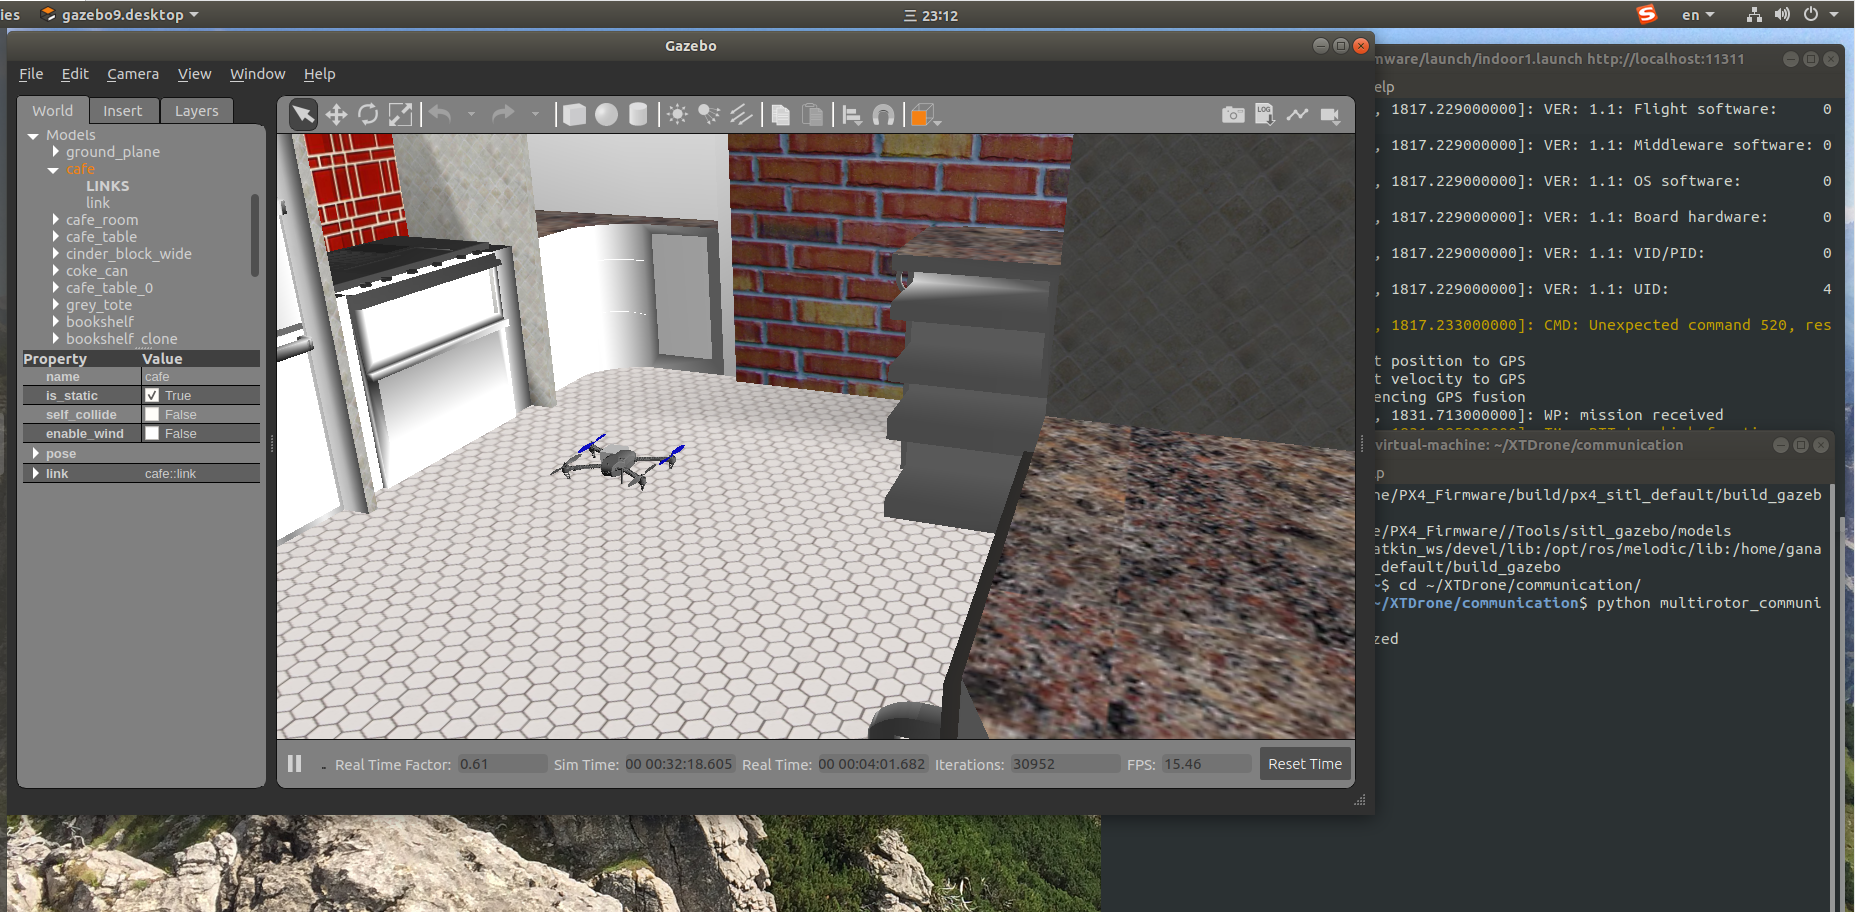
Gazebo启动后,在另一个终端运行:
cd ~/XTDrone/communication/
python multirotor_communication.py iris 0
与0号iris建立通信后,再打开另一个终端运行:
cd ~/XTDrone/control/keyboard
python multirotor_keyboard_control.py iris 1 vel
便可以通过键盘控制1架iris的解锁/上锁(arm/disarm),修改飞行模式,飞机速度等。
键盘对应控制如下:
Control Your XTDrone!
To all drones  (press g to control the leader)
---------------------------
   1   2   3   4   5   6   7   8   9   0
        w       r    t   y        i
   a    s    d       g       j    k    l
        x       v    b   n        ,

w/x : increase/decrease forward velocity
a/d : increase/decrease leftward velocity
i/, : increase/decrease upward velocity
j/l : increase/decrease orientation
r   : return home
t/y : arm/disarm
v/n : takeoff/land
b   : offboard
s/k : hover and remove the mask of keyboard control
0~9 : extendable mission(eg.different formation configuration)
      this will mask the keyboard control
g   : control the leader
CTRL-C to quit
使用v起飞利用的是takeoff飞行模式,相关参数(起飞速度、高度)要在rcS中设置。
一般可以使用offboard模式起飞,这时起飞速度要大于0.3m/s才能起飞(即:upward velocity 需要大于0.3)。注意,飞机要先解锁才能起飞!飞到一定高度后点击v可以切换为hover模式悬停,再运行自己的飞行脚本,或利用键盘控制飞机。
起飞流程:
-
按i把向上速度加到0.3以上
-
再按b切offboard模式
-
最后按t解锁。
注意,现在mavros话题与服务前带有了无人机名字,如:/iris_0/mavros/state
仿真是可以暂停的,如下面的视频所示,点Gazebo的暂停键
仿真过程可以暂停.mp4
由于不同版本的Gazebo对光照的设置不同,因此有些场景在一些版本中光照可能不合适,您可以手动调整删除一些光照源。如indoor1在Gazebo9.15中,如果不做修改,光线就很亮,可以删除原先的一些光照源,保留下图所示的光照源。
到此,仿真平台基础配置完成!!
参考文献
[1]XTDrone无人机仿真平台基础配置
[2]ROS Melodic安装官方教程
[3]Gazebo安装官方教程
[4]Px4仿真文档
[5]QGroundControl地面控制站安装官方教程
Comments 3 条评论
来自网友的认可哈哈哈哈哈
大佬方便解惑一下吗,配置PX4的时候make px4_sitl_default gazebo执行的时候,最后终端卡在INFO [ecl/EKF] 5108000: commencing GPS fusion了,没有命令行跳出来,是不是说明还没有编译完成阿
@347398278 从仅有的信息无法判断哈